This is one in a small series of blog posts about Kubernetes Service Meshes, please check there for reference. While the previous post started out by introducing the general picture and the basic concepts, here I will deal with a specific implementation and its respective details.
All contents presented here will be covered in more detail as part of the Novatec training “Docker und Kubernetes in der Praxis”. And of course all shown technologies have more features than merely those presented here, where I will only provide a glimpse into them.
Istio
Istio is an open platform-independent service mesh that provides traffic management, policy enforcement, and telemetry collection:
- Open: Istio is being developed and maintained as open-source software using the Apache License 2.0. The Istio project was started by teams from Google and IBM in partnership with the Envoy team from Lyft. It’s been developed fully in the open on GitHub.
- Platform-independent: Istio is not targeted at any specific deployment environment. Istio currently supports environments running container orchestration platforms such as Kubernetes and Nomad with Consul.
- Service mesh: Istio is designed to manage communications between microservices and applications. Without requiring changes to the underlying services, Istio provides automated baseline traffic resilience, service metrics collection, distributed tracing, traffic encryption, protocol upgrades, and advanced routing functionality for all service-to-service communication.
Istio also supports Traffic Access Control, Circuit Breaking and Rate Limiting, and more Chaos Monkey-style Testing (Failure Injection) and Distributed Tracing, and mTLS for all protocols.
Istio has the most features and flexibility of any of the popular Service Meshes by far, but remember that flexibility means complexity, so any team wishing to adopt Istio needs to be ready for that.
By the way, “istio” is the Greek word for “sail”.
Although Google, IBM, and Lyft sponsored the original development of Istio, they do not offer any kind of support for it. However, IBM’s OpenShift Enterprise product offers paid support for OpenShift Service Mesh, a productized version of Istio designed for performance and operational stability.
Classic Istio vs. Ambient Mesh
Here I will describe the classic Istio setup and not the Istio Ambient Mesh: A new dataplane mode for Istio without sidecars as that one still has quite some limitations and is experimental.
Installation
CLI
As per Istio / Getting Started I can download the CLI directly. At the time of this writing this is version 1.17.0 and thus
$ curl --silent --location https://github.com/istio/istio/releases/download/1.17.0/istioctl-1.17.0-linux-amd64.tar.gz | tar --directory=$HOME/bin -xzvpf -
will serve to install the CLI to my local system.
Cluster
Using this CLI I can then deploy the Istio components into a Kubernetes cluster (any cluster will do as long as I have sufficient permissions, even tiny local ones running via Minikube or KinD) just as per Istio / Getting Started:
# providing any profile parameter will skip the "Proceed?" dialogue, and we want "default" here anyways
$ istioctl install --set profile=default --set meshConfig.accessLogFile=/dev/stdout --skip-confirmation
# install some add-ons (there may be some timing issues which will be resolved when the command is run again)
$ kubectl apply -f https://raw.githubusercontent.com/istio/istio/1.17.0/samples/addons/prometheus.yaml
$ kubectl apply -f https://raw.githubusercontent.com/istio/istio/1.17.0/samples/addons/jaeger.yaml
$ kubectl apply -f https://raw.githubusercontent.com/istio/istio/1.17.0/samples/addons/kiali.yaml
Integrate workloads
Now that the Istio control plane is running in my cluster I can start integrating workloads. For that I can simply mark a namespace for auto-injection of the data plane sidecar proxies via a specific label:
$ kubectl label namespace default istio-injection=enabled # or any other namespace instead of "default"
This will ensure that any future deployments to this namespace will be handled by Istio. And if I already have any deployments in this namespace I could simply trigger their integration via
$ kubectl get deployments -o yaml | istioctl kube-inject -f - | kubectl apply -f -
I will now deploy two sample applications that together build a simple todo list. First a backend:
apiVersion: apps/v1
kind: Deployment
metadata:
  name: todobackend
spec:
  replicas: 1
  selector:
    matchLabels:
      app: todobackend
      version: "0.1"
  template:
    metadata:
      name: todobackend
      labels:
        app: todobackend
        version: "0.1"
    spec:
      containers:
      - name: todobackend
        env:
        - name: SPRING_PROFILES_ACTIVE
          value: dev
        image: novatec/technologyconsulting-containerexerciseapp-todobackend:v0.1
      restartPolicy: Always
---
apiVersion: v1
kind: Service
metadata:
  name: todobackend
  labels:
    app: todobackend
spec:
  type: ClusterIP
  ports:
  - port: 8080
    name: http-todobackend
  selector:
    app: todobackend
And then a frontend:
apiVersion: apps/v1
kind: Deployment
metadata:
  name: todoui
spec:
  replicas: 1
  selector:
    matchLabels:
      app: todoui
      version: "0.1"
  template:
    metadata:
      name: todoui
      labels:
        app: todoui
        version: "0.1"
    spec:
      containers:
      - name: todoui
        image: novatec/technologyconsulting-containerexerciseapp-todoui:v0.1
      restartPolicy: Always
---
apiVersion: v1
kind: Service
metadata:
  name: todoui
  labels:
    app: todoui
spec:
  type: LoadBalancer
  ports:
  - port: 8090
    name: http-todoui
  selector:
    app: todoui
Please note that Istio assumes all Services are labeled the same way as their corresponding Deployment in order to sort them together, cf. Pods and Services, and all Service ports are properly named indicating the type of traffic they will receive (e.g. http or tcp-<arbitraryname>, cf. Protocol Selection).
In addition, the deployments should have a version label to allow Istio – or rather Kiali, see below – to display their version. If none were set, Kiali would default to the dreaded latest.
Examine the meshed workloads
When I now examine the newly-deployed workloads I can see what Istio has automatically added:
$ kubectl get po
NAME                           READY   STATUS    RESTARTS   AGE
todobackend-67899c988c-59w59   2/2     Running   0          1m47s
todoui-65fbdcb8c5-5rnkn        2/2     Running   0          1m32s
Please note that each pod now consists of two containers. Let’s inspect those a bit to take a look under the hood:
$ kubectl describe pod todoui-65fbdcb8c5-5rnkn [...] Init Containers: istio-init: [...] Containers: todoui: [...] istio-proxy: [...] [...]
and also
$ kubectl logs todoui-65fbdcb8c5-5rnkn istio-init
[...]
2023-02-21T12:55:00.622846Z     info    Writing following contents to rules file: /tmp/iptables-rules-1676984100622351839.txt2201563002
[...]
-A ISTIO_REDIRECT -p tcp -j REDIRECT --to-ports 15001
COMMIT
# Completed on Tue Feb 21 12:55:00 2023
as well as
$ kubectl logs todoui-65fbdcb8c5-5rnkn istio-proxy
[...]
2023-02-21T12:55:05.531776Z     info    Version 1.17.0-c8c901a56861021dc25412f2e557b72a235b554c-Clean
[...]
2023-02-21T12:55:05.545859Z     info    Proxy role      ips=[10.244.0.13] type=sidecar id=todoui-65fbdcb8c5-5rnkn.default domain=default.svc.cluster.local
[...]
2023-02-21T12:55:06.284533Z     info    cache   generated new workload certificate      latency=593.188656ms ttl=23h59m59.715478743s
2023-02-21T12:55:06.284570Z     info    cache   Root cert has changed, start rotating root cert
[...]
2023-02-21T12:55:06.898306Z     info    Readiness succeeded in 1.382153952s
2023-02-21T12:55:06.898761Z     info    Envoy proxy is ready
So, not only did the pod receive an additional container in which the istio-proxy runs, but there was also an init container executed before any other containers were started that merely took care of redirecting all traffic to the istio-proxy container. Neat.
Feel free to check the full command output, of course. I have redacted the output somewhat to pinpoint some specific parts, but you will see that Istio has added quite some additional information altogether.
Overhead
Of course, this comes at a certain price per pod for the data plane proxy, check e.g.
$ kubectl top pod todoui-65fbdcb8c5-5rnkn --containers
POD                       NAME          CPU(cores)   MEMORY(bytes)
todoui-65fbdcb8c5-5rnkn   istio-proxy   3m           47Mi
todoui-65fbdcb8c5-5rnkn   todoui        2m           664Mi
47Mi RAM and some CPU cycles already, and without handling any real work at the moment. Once real work starts the overhead can get quite high as shown in benchmarks. But of course there is also the control plane as well as the various helper applications:
$ kubectl top pod --namespace istio-system
NAME                                    CPU(cores)   MEMORY(bytes)
istio-ingressgateway-6d98749ff5-986wz   5m           46Mi
istiod-7448594799-x7lxb                 2m           66Mi
jaeger-76cd7c7566-7g4cf                 14m          50Mi
kiali-7d7df7458c-8zgkc                  2m           34Mi
prometheus-85949fddb-tppqj              4m           261Mi
Investigate network traffic using Kiali
First let’s put some load on the deployed and meshed todo app, so I execute in a separate command window:
LOADBALANCER_IP="$(kubectl get svc todoui -o jsonpath="{.status.loadBalancer.ingress[0].ip}")"
while sleep 2; do
    curl --silent "http://$LOADBALANCER_IP:8090" | head -n 4
done
Of course feel free to also access the todo app frontend pointing your browser of choice at that URL. But what does Istio know about this traffic now?
So I’ll open a port-forwarding to the Kiali dashboard, i.e. a web interface:
$ kubectl --namespace istio-system port-forward svc/kiali 20001
Now I will be able to access this through my local browser at http://localhost:20001/, and I will see the application like in the following pictures:
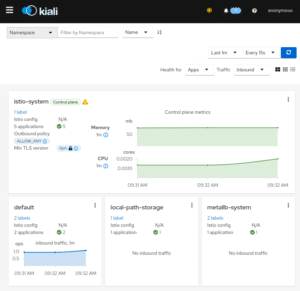
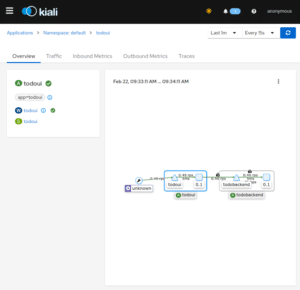
So using this Kiali dashboard I can readily gain insight into the structures I have deployed, seeing them nicely visualized and also having access to various network performance metrics and traces, i.e. all the live traffic from our LoadBalancer while loop from above will be attributed correctly: traffic coming in on our LoadBalancer Service, i.e. external to Kubernetes and thus unknown, will reach the todoui Service and then the todoui Deployment Pod, which in turn will contact the todobackend Service and thus the todobackend Deployment Pod.
And in addition to the various methods, paths and metrics Kiali also indicates that the cluster-internal connection from todoui to todobackend is encrypted using mutual TLS (mTLS), i.e. with both sender and receiver using certificates to identify each other and to encrypt the communication – as handled by the sidecar proxies. However, the external connection is not yet secured, but more on that later on.
And yes, there also exists a istioctl dashboard kiali command, but the above way via kubectl could be used even if the istioctl binary were not available locally, hence the mention.
Traffic shaping
Now that I have made use of some basic functionality commonly provided by a Service Mesh, i.e. network observability and cluster-internal traffic encryption, I’d like to start steering my traffic.
First I will make my workload available in a different manner.
Istio Ingress, Gateway and VirtualService
Istio includes its own Ingress implementation. And while using the standard Kubernetes Ingress resources work as well with it, e.g. setting kubernetes.io/ingress.class: istio accordingly, it’s advisable to use the specific Istio resources to achieve best results, as the tight integration allows for some neat functionality.
So first I’m going to create a simple self-signed certificate for my todo application which also includes the public IP address of my Istio IngressGateway made accessible via nip.io wildcard DNS, and make it available for Istio:
INGRESS_IP_ISTIO=$(kubectl get service --namespace istio-system istio-ingressgateway -o jsonpath='{.status.loadBalancer.ingress[].ip}')
openssl req -x509 -sha256 -nodes -days 365 -newkey rsa:2048 -keyout todoapp.key -out todoapp.crt -subj "/CN=todoapp.$INGRESS_IP_ISTIO.nip.io"
kubectl create secret generic --namespace istio-system todoapp-tls --from-file=key=todoapp.key --from-file=cert=todoapp.crt
Yes, of course it would be possible to automate this certificate creation, e.g. using cert-manager providing Let’s Encrypt integration, but I’d like to keep the number of moving parts low here for now. And also yes, the secret needs to be created in the istio-system namespace for the Istio IngressGateway to find it.
With that in place I can configure my Istio IngressGateway using some Istio-specific resources (wrapped in a kubectl call so I can use the INGRESS_IP_ISTIO variable from above):
$ kubectl apply -f - <<.EOF
apiVersion: networking.istio.io/v1alpha3
kind: Gateway
metadata:
  name: todoui
spec:
  selector:
    istio: ingressgateway
  servers:
  - port:
      number: 80
      name: http
      protocol: HTTP
    hosts:
    - "todoapp.$INGRESS_IP_ISTIO.nip.io"
    tls:
      httpsRedirect: true
  - port:
      number: 443
      name: https
      protocol: HTTPS
    hosts:
    - "todoapp.$INGRESS_IP_ISTIO.nip.io"
    tls:
      mode: SIMPLE
      minProtocolVersion: TLSV1_2
      credentialName: todoapp-tls
---
apiVersion: networking.istio.io/v1alpha3
kind: VirtualService
metadata:
  name: todoui
spec:
  hosts:
  - "todoapp.$INGRESS_IP_ISTIO.nip.io"
  gateways:
  - todoui
  http:
  - match:
    - uri:
        prefix: /
    route:
    - destination:
        host: todoui.default.svc.cluster.local # as deploying to the "default" namespace
        port:
          number: 8090
.EOF
With that set up I can put some load on it. So I’ll cancel the while loop pestering the LoadBalancer Service from above and start this one instead:
INGRESS_IP_ISTIO=$(kubectl get service --namespace istio-system istio-ingressgateway -o jsonpath='{.status.loadBalancer.ingress[].ip}')
CURL="curl --silent --location --insecure" # insecure due to the self-signed certificate
while sleep 2; do
    $CURL https://todoapp.$INGRESS_IP_ISTIO.nip.io/ | head -n 4
done
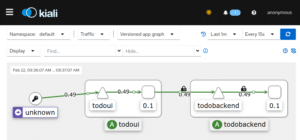
That is, instead of accessing the todo ui directly via a LoadBalancer, I will now access it via the Istio IngressGateway, which in turn will secure the connection using the self-signed certificate created above. And after a short while Kiali will represent this roughly as follows:
So by now all connection edges right from traffic entering the cluster at the IngressGateway all the way down to the todobackend will be secured. And the new icon on the todoui Service denotes the VirtualService resource I had just created which I will further utilize now.
Prepare for versioned deployment
Using an Istio-specific DestinationRule resource in combination with a slightly adjusted VirtualService resource I can control where incoming traffic will be directed to. This will provide the groundwork onto which I will later on deploy another version of the todoui component.
So first I’m going to ensure all traffic will still only reach my current version, no matter what else might be deployed (again wrapped in a kubectl call so I can use the INGRESS_IP_ISTIO variable from above):
$ kubectl apply -f - <<.EOF
apiVersion: networking.istio.io/v1alpha3
kind: DestinationRule
metadata:
  name: todoui
spec:
  host: todoui.default.svc.cluster.local # as deploying to the "default" namespace
  trafficPolicy:
    tls:
      mode: ISTIO_MUTUAL
  subsets:
  - name: v0-1
    labels:
      app: todoui
      version: "0.1"
  - name: v0-2
    labels:
      app: todoui
      version: "0.2"
---
apiVersion: networking.istio.io/v1alpha3
kind: VirtualService
metadata:
  name: todoui
spec:
  hosts:
  - "todoapp.$INGRESS_IP_ISTIO.nip.io"
  gateways:
  - todoui
  http:
  - match:
    - uri:
        prefix: /
    route:
    - destination:
        host: todoui.default.svc.cluster.local # as deploying to the "default" namespace
        subset: v0-1
        port:
          number: 8090
      weight: 100
    - destination:
        host: todoui.default.svc.cluster.local # as deploying to the "default" namespace
        subset: v0-2
        port:
          number: 8090
      weight: 0
.EOF
Kiali will still display an error message stating that “This subset’s labels are not found in any matching host” which is due to no 0.2 version deployment of the todoui being available yet.
However, now – with the above in place – I can fix that:
apiVersion: apps/v1
kind: Deployment
metadata:
  name: todoui-0-2
spec:
  replicas: 1
  selector:
    matchLabels:
      app: todoui
      version: "0.2"
  template:
    metadata:
      name: todoui
      labels:
        app: todoui
        version: "0.2"
    spec:
      containers:
      - name: todoui
        image: novatec/technologyconsulting-containerexerciseapp-todoui:v0.2
      restartPolicy: Always
The only differences to the previous 0.1 version deployment of the todoui are the name now having the version appended and the adjusted version: “0.2” label and selector. Well, and actually using a new image version. All of which won’t hinder the todoui Service or the todoui VirtualService as provided by Istio to still find the Pods belonging to this Deployment.
Make the versioned deployment available
Now how can I make the todoui-0-2 Deployment gradually available so that I can test it? Of course, in my small environment here I could just go live with it, but what if it was an important web service whose correct functioning is essential for my business. Yes, naturally I’d have a plethora of integration tests and automated or manual QA completed before I eventually deploy a new version to prod (right?!), but do I still dare to just let it loose on the general public?
Well, I’ll just make it available to a subset of access requests for now, just to be on the safe side (again wrapped in a kubectl call so I can use the INGRESS_IP_ISTIO variable from above):
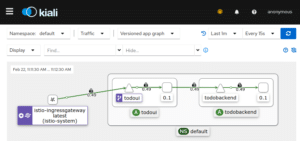
$ kubectl apply -f - <<.EOF
apiVersion: networking.istio.io/v1alpha3
kind: VirtualService
metadata:
  name: todoui
spec:
  hosts:
  - "todoapp.$INGRESS_IP_ISTIO.nip.io"
  gateways:
  - todoui
  http:
  - match:
    - uri:
        prefix: /
    route:
    - destination:
        host: todoui.default.svc.cluster.local # as deploying to the "default" namespace
        subset: v0-1
        port:
          number: 8090
      weight: 90
    - destination:
        host: todoui.default.svc.cluster.local # as deploying to the "default" namespace
        subset: v0-2
        port:
          number: 8090
      weight: 10
.EOF
The newly-added weight settings on the destination routes are the key here. And once deployed Kiali will eventually display my application structure like this, representing the split into roughly 90%/10% of the traffic:

In a prod deployment now would be a great time to meticulously study my monitoring to see whether the newly deployed application version shows any erratic behavior in success rate, response times / latency or anything else deemed worthy of checking, and if not I would gradually shift more and more traffic over until finally all requests will be served by the new version. This procedure is called a Canary Deployment: just like back in the coal mines let’s have some test subject which we can examine whether everything is as it should.
Reality check and further outlook
Please note that while the features showcased here so far for Istio are indeed neat, they are not all unique to Istio. A canary deployment, weighted or opt-in, can be conducted using Linkerd as well, even with automated shifting of traffic over to the new release as long as predefined metrics stay at a sane level, cf. Automated Canary Releases | Linkerd.
And the common Ingress Controllers can act similarly, albeit of course only at the Ingress level and not at arbitrary places inside our cluster network.
Still, Istio provides the widest set of features for any Service Mesh: starting with what we have seen already, i.e. including an Ingress Controller on its own, various metrics and observability means, request routing and traffic shifting, service authentication and authorization, one also gets
- fault injection to test the resiliency of your application
- rate limiting to dynamically limit the traffic to a service
- request timeouts and circuit breaking to limit the impact of failures, latency spikes, and other undesirable effects of network peculiarities
- traffic mirroring for out of band copying of traffic to test new services
- egress gateways for filtering which external services should be reachable
See Istio / Next Steps for getting started on these.
Conclusion
The Istio Service Mesh readily provides the basics one would expect from a Service Mesh, such as:
- cluster-internal network observability
- fully-handled cluster-internal transfer encryption via mTLS
- cluster-internal traffic shaping
and much more as just shown above.
However, Istio is not necessarily the most resource-efficient solution, so if a Service Mesh is needed and these specific features will be required Istio will be a good choice, but at a cost.
Get in touch with us via mail – info@novatec-gmbh.de !